Before you upload: what you need
To post a podcast, you need three basic pieces:
- A podcast name and topic
- Cover art, usually square and easy to read at small sizes
- At least one finished episode, either uploaded as audio or generated inside your podcast platform
With PoddyHost, you can create the show first, then let AI write and narrate episodes for you. That removes the usual recording and editing step, but the publishing flow is still the same: create the show, generate or add episodes, publish them, then distribute the RSS feed.
If you are still planning the concept, start with How to Start a Podcast. If budget is the main concern, see How to Start a Podcast for Free.
How to upload a podcast in PoddyHost
1. Create or open your podcast
After signing in, open your PoddyHost dashboard. This is where your podcasts are listed, along with episode counts, publishing status, Auto Mode controls, and quick actions.

If you already created a podcast, choose it from the dashboard. If you are starting fresh, create a new podcast by entering the topic, choosing the AI narrator voice, and adding cover art. PoddyHost can generate cover art, or you can upload your own if you already have a finished design.
For beginners, keep the first version simple. A clear title, narrow topic, and readable cover art matter more than trying to make the show perfect before it has any episodes.
2. Choose the voice and show setup
Each podcast in PoddyHost has its own AI narrator voice. Pick a voice from the narrator library and listen to the sample before publishing your first episode. The voice becomes part of the show's identity, so choose one that fits the tone: calm for educational topics, more energetic for news or commentary, and neutral for business or evergreen content.
You can also prepare sponsor or ad text if you want it inserted into episodes. This is useful when you have a recurring CTA, affiliate offer, newsletter signup, or sponsor read that should appear consistently.
3. Generate or add your first episode
Open the podcast's episode list. This is where episodes move through statuses such as queued, generating, published, or failed.

In PoddyHost, you can create an episode manually or use Auto Mode. For a manual episode, provide the topic or keyword, review the generated script direction, and start generation. PoddyHost writes the script, narrates it in the selected voice, and creates the finished MP3.
If you want a hands-off publishing schedule, turn on Auto Mode from the dashboard. Auto Mode publishes one new episode per day using your topic-keyword pool and AI suggestions.
4. Check the episode status
Once an episode is created, watch its status in the episode list. A queued episode is waiting to be processed. A generating episode is being written or narrated. A published episode is live and included in your podcast feed. A failed episode needs attention and may need to be regenerated.
Do not submit your show to directories until at least one episode is published. Most podcast directories expect a valid RSS feed with a show title, cover art, and at least one playable audio episode.
5. Open the public podcast page
After publishing, open the public podcast page. This page lists your published episodes and gives you access to the RSS feed and Spotify submission link.
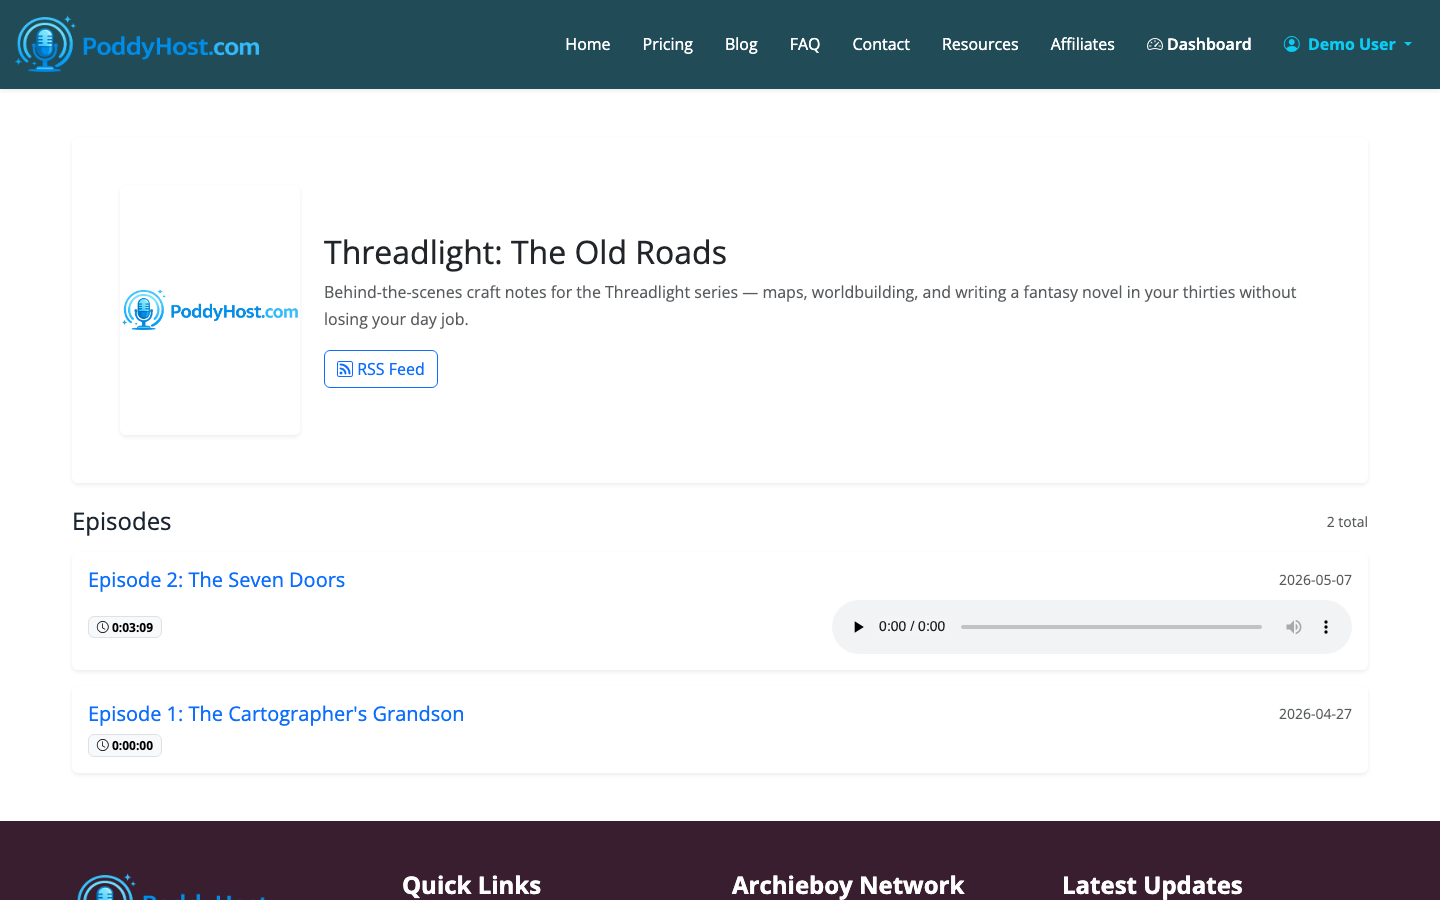
This page is also useful for checking what listeners will see. Confirm that the title, cover art, episode names, and audio are correct before you submit the feed widely.
6. Submit the podcast to directories
PoddyHost automatically pushes your RSS feed to Podcast Index. You can also use the one-click Spotify submission from the public podcast page.
For Apple Podcasts, Amazon Music, and other directories, the usual process is to copy your RSS feed URL and submit it inside that directory's creator portal. Once approved, new episodes published through PoddyHost are added to the same RSS feed, so you do not need to upload each episode separately to every app.
This is the key difference between uploading and publishing: uploading gets the audio onto your host; publishing updates the RSS feed; directory submission tells listening apps where to find that feed.
7. Share and maintain the show
Once your podcast is live, share the public page, Spotify link, or directory links with listeners. For ongoing publishing, keep a small pool of episode topics ready. PoddyHost can suggest topic keywords, but your best ideas will usually come from audience questions, search terms, customer objections, and recurring conversations in your niche.
If this is your first show, How to Start a Podcast for Beginners covers the broader launch decisions: format, audience, episode length, and consistency.
How long does publishing take?
Inside PoddyHost, a generated episode may take a few minutes to move from queued to published, depending on length and processing demand. Directory approval takes longer. Spotify can be relatively fast, while Apple Podcasts and other directories may take hours or days for the first approval.
After the initial approval, future episodes are simpler. Publish the episode in PoddyHost, and the RSS feed updates automatically. Podcast apps then refresh from that feed on their own schedule.
Common upload mistakes to avoid
The biggest mistake is thinking every podcast app needs a separate upload. In most cases, you upload or generate the episode once in your host, then let RSS handle distribution.
Other common issues include changing the show name too often, using cover art with tiny text, submitting a feed before an episode is published, and publishing long episodes before testing the voice and structure.
The short version
If you are asking, "how do I upload a podcast?" the practical answer is:
- Create the podcast in a hosting platform.
- Add the show details, voice, and cover art.
- Generate or upload the first episode.
- Publish the episode so it appears in the RSS feed.
- Submit the RSS feed to Spotify, Apple Podcasts, Amazon Music, and other directories.
- Keep publishing new episodes through the host.
PoddyHost is built for creators who want to skip the recording and editing process. You set the topic and voice, PoddyHost creates the episode audio, and the RSS feed handles distribution.
See it in action
For an example of AI-written audio content in a marketing context, see Ai Ad Writing.